General Information:
Arduino pins:
| pin | type | function | notes |
|---|---|---|---|
| d0 | digital | Rx | not available if using serial |
| d1 | digital | Tx | not available if using serial |
| d2 | INT0 | Interrupt 0 | |
| d3 | PWM, INT1 | Interrupt 1 | |
| d4 | |||
| d5 | PWM | ||
| d6 | PWM | ||
| d7 | |||
| d8 | |||
| d9 | PWM | pwm not available if using servo library | |
| d10 | PWM | pwm not available if using servo library | |
| d11 | PWM, MOSI | ||
| d12 | MISO | ||
| d13 | SCK | ||
| a0 (d14) | analog | 10 bit ADC | can also use as digital I/O |
| a1 (d15) | analog | 10 bit ADC | can also use as digital I/O |
| a2 (d16) | analog | 10 bit ADC | can also use as digital I/O |
| a3 (d17) | analog | 10 bit ADC | can also use as digital I/O |
| a4 (d18) | analog | 10 bit ADC, SDA | can also use as digital I/O |
| a5 (d19) | analog | 10 bit ADC, SCL | can also use as digital I/O |
Ardweeny:

Note: might have to pull the ardweeny out from the board before uploading a program. was not able to do it with the antistatic foam on the pins.
Note: when programming the Ardweeny, make sure no ftdi is connected to the serial port, else was getting error "avrdude stk500_getsync not in sync resp 0x00"
(view from top, LED on left)

Rx  : d00
Tx  : d01
PWM : d03, d05, d06, d09, d10, d11
LED : d13

 |    |    |    |    |    |    |    |    |    |    |    |    |    |
d08  d07  d06  d05  xtl  xtl  Gnd  Vdd  d04  d03  d02  d01  d00  Rst
 |    |    |    |    |    |    |    |    |    |    |    |    |    |
--------------------------------------------------------------------
|  (LED)            Solarbotics Ardweeny ATMega 328                |
--------------------------------------------------------------------
 |    |    |    |    |    |    |    |    |    |    |    |    |    |
d09  d10  d11  d12  d13  A+.  Arf  Gnd  a00  a01  a02  a03  a04  a05
 |    |    |    |    |    |    |    |    |    |    |    |    |    |
//Blink - Turns on an LED on for one second, then off for one second, repeatedly.
//
void setup() {
  pinMode(13, OUTPUT); // init the hardwired pin13 LED as output
}
//
void loop() {
  digitalWrite(13, HIGH);   // set the LED on
  delay(1000);           // wait for a second
  digitalWrite(13, LOW); // set the LED off
  delay(1000);           // wait for a second
}
Also, the Ardweeny can be mounted into the socket of a standard 328-based Arduino board, and use the board to program the Ardweeny. Handy for when you need to reburn a boot-loader, or you're short on FTDI adapters.

ATmega328 with Arduino Optiboot (Uno):
An ATmega328 in DIP package, pre-loaded with the Arduino Optiboot (Uno 16MHz) Bootloader. This will allow you to use Arduino code in your custom embedded project without having to use an actual Arduino board. From the Arduino IDE, select "Arduino Uno" as the board.
To get this chip working with Arduino IDE, you will need an external 16MHz crystal or resonator, a 5V supply, and a serial connection. If you are not comfortable doing this, we recommend purchasing the Arduino Uno board that has all of these built into the board.
Atmel's ATMega328 8-Bit Processor in 28 pin DIP package. It's like the ATmega168, with double the flash space. 32K of program space. 23 I/O lines, 6 of which are channels for the 10-bit ADC. Runs up to 20MHz with external crystal. Package can be programmed in circuit. 1.8V to 5V operating voltage!
Note: This contains the bootloader used on the Arduino Uno, with small modifications to work more reliably with different serial connection options (mainly the FTDI). Check the Sparkfun link below for more information.

Minimal Connections:

This circuit is using a 16MHz ceramic resonator (with built in capacitors) from Sparkfun. Might have to use a 16MHz crystal and capacitors, if more accurate timing is required.
To program it, use the Sparkfun FTDI Breakout Board. The headers in the circuit above are setup to match the header from this particular board. The board is set to provide 5V power. When programming, supply power through the FTDI board Vcc header (and remove other power sources so that this is the only source powering the ATMega). For the bootloader that came with this micro, set the Arduino IDE for the UNO board.

This is a board that I made to help program these chips. I tend not to do in-circuit programming, preferring to pull out the chip from the project, program it on this board, and then put it back.
Programming ATTinys using the Arduino:
This is from the MIT High Low Tech lab.
Extend the Arduino IDE:
- Was running the Arduino IDE 1.0.1 on 32-bit Linux Mint
- Downloaded attiny-master from https://github.com/damellis/attiny/archive/master.zip
- Got the sketchbook location from File -> Preferences -> Sketchbook location. Moved the attiny folder inside that to /home/nr/sketchbook/hardware.
Set the Arduino as an ISP:
- Upload the ArduinoISP sketch from the examples
- Connect 10uF cap between ground and reset on the Arduino
- Provide GND and 5v to ATTiny from the Arduino
- Connect the Arduino pins below to the corresponding pins on the ATTiny
- 13 - SCK
- 12 - MISO
- 11 - MOSI
- 10 - RESET
Upload programs to the ATTiny:
Select the apporpriate board (1MHZ default, 8MHZ, if need to run SoftwareSerial)
- pinMode()
- digitalWrite()
- digitalRead()
- analogRead()
- analogWrite()
- shiftOut()
- pulseIn()
- millis()
- micros()
- delay()
- delayMicroseconds()
- SoftwareSerial
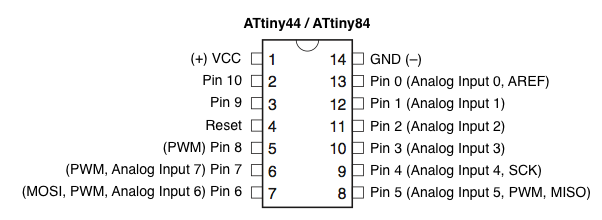
Pinouts:

Arduino Mega clones:
Arduino Compatible Mega 1280-16AU USB Board
- Microcontroller: ATmega1280
- Input Voltage: 7~12V
- Digital I/O Pins: Total 54 (14 PWM output)
- Analog Input Pins: 16
- Flash Memory: 128KB
- SRAM: 8KB
- EEPROM: 4KB
Got this from dealextreme.
Arduino Compatible Mega 2560-8AU USB Board

- Microcontroller ATmega2560
- Operating Voltage 5V
- Input Voltage (recommended) 7-12V
- Input Voltage (limits) 6-20V
- Digital I/O Pins: 54 (of which 14 provide PWM output)
- Analog Input Pins 16
- DC Current per I/O Pin 40 mA
- DC Current for 3.3V Pin 50 mA
- Flash Memory: 256 KB of which 8 KB used by bootloader
- SRAM 8 KB
- EEPROM 4 KB
- Clock Speed 16 MHz
Got this from Goodluckbuy.
Funduino UNO R2 ATmega328P

Got this from Dx.
Nano V3 microcontroller atmega328p 16MHz 5v:


Select "Arduino Nano with ATmega328" as the target board.
Got from this seller's ebay listing.
Nano 3.0 Controller Board Compatible with Arduino Nano CH340 USB Driver
